
DISCLAIMER: DO NOT USE THIS LUMINARIA WITH CANDLES THAT HAVE AN OPEN FLAME! USE ONLY WITH BATTERY OPERATED CANDLES!
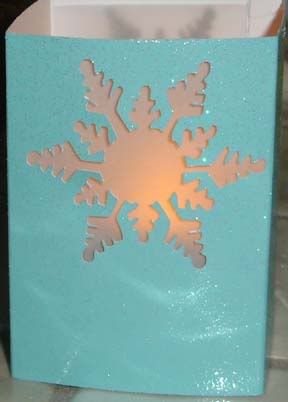
This is a VERY simple project, but it is my first Gypsy design that I did all on my own. Someone else may have already made one of these, but I haven't seen them. I was inspired to make this after I discovered how expensive the Febreze Luminarias are! This is a luminaria that holds the little battery operated tea lights. I found them at Dollar Tree, 4 in a package for $1. I used blue glitter paper and vellum. I'll post the pics and the gypsy file, then try to explain how to assemble these.
For the Gypsy file, click here.
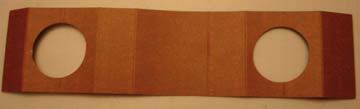
The assembly is easy, but kind of difficult to explain. Wish I was a video wiz, but I'm not, so I'll do the best I can. The file will cut two pieces. One with two round holes, we'll call this piece section A. This piece will create the base for your luminaria and the tea light holder. The other piece has the snowflake cut-outs. Feel free to delete those if you wish. We'll call this piece section B, and it creates the shade for the luminaria.
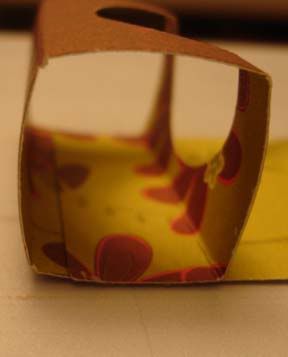
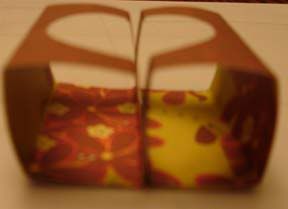
Starting with section A, score at 1", 2", 3", 4", 6", 7", 8" and 9". Your score lines at 2" and 8" will intersect right through the center of the circle cut-outs. Fold all your score lines. Apply adhesive to each end. Starting on the left end, begin folding the score lines toward the center. This will create 1/2 of a box-type assembly with half of a circle cut out in the top. Now do the same thing from the right end. You will now have a box-type piece with a round hole cut out in the center of the top. This is your tea light holder and the base of your luminaria. Set this piece aside.
Now for section B, the shade. Simply score it at 2 1/2", 4 1/2", 7" and 9". There will be a little flap left at the end. Fold all your score lines. Apply adhesive to the small flap and assemble the shade by simply connecting the flap to the other end of Section B. Slide the shade onto the base and place your tea light inside.
For my sample, I used vellum behind the snowflakes. This is optional, and you can also replace the snowflakes with whatever design you prefer, or delete the design altogether.
Clear as mud??? I hope you can understand these instructions. They are really easy to make! Honest!!!
Have fun!
Maybe a few pics will help! Hope so. Any questions, please don't hesitate to email me. And don't forget to scroll up the page to enter my November give-away!


This is so pretty! How exciting to do your very first Gypsy project. Mine is still in the box!
ReplyDelete