Just had to post a note of congratulations for the lovely Monique Griffith who just finished her treatment for breast cancer TODAY!!! WOOHOO!!!! This is so awesome, and I am overcome with emotion!!! If you would like to leave a note of congratulations for yourself, you can visit her blog at:
http://www.monkeydoodlecricut.blogspot.com/
Hugs!
Thursday, January 13, 2011
Sunday, January 9, 2011
Here's what I've been doing today!
Hi, everyone!
Hope you are all having a blessed Sunday!! It's so cold and dreary here that I really got into a creative mood, so I decided to dye some rayon seam binding. I've been seeing this all over the internet and couldn't wait to try my hand at it. It is so easy and I love the look!!! Have you tried it yet??? Here's a tip for ya: WEAR GLOVES!! haha Ask me how I know!!!
Hugs!

Tuesday, January 4, 2011
Another tool caddy!
Hi, everyone, and thanks for stopping by. Well, sometimes I just hit at something that's fun and useful. After altering the coffee can for the SSPT January challenge, I started looking around for other useful items that could work to hold my ever-expanding supply of necessary crafting tools. So, I found this Cascade dishwasher detergent tub and decided to decorate it with coordinating papers. I love the look, but, as you can see, I need MORE!!! So, I'm on another search for items to alter for tool caddies!!!
Thanks for visiting my blog!
 Hugs!
Hugs!
Thanks for visiting my blog!

Sunday, January 2, 2011
SSPT Challenge update pics
OK, I couldn't leave well enough alone!! haha After I posted the first set of pictures, I remembered my Viva Decor Pearl Pen and thought some pearl dots would add to the dimension. The pictures aren't great, but I think you can tell a difference. I think the pearl pen gave this project a more finished look and added some dimension to the design. What do you think??
Hugs!
Linda


Hugs!
Linda


Sugar Sweet Paper Treats Challenge Project
Hi, everyone!
This is my project for the January challenge at Sugar Sweet Paper Treats. The challenge was to alter something. This is a simple coffee can. I covered it with paper, then fussy cut the border and added that to the can, then used TONS of Stickles to make the flowers all shimmery! I even used my Imagine. I discovered that the color pallete of Lori's Garden matched my papers perfectly, so the back is decorated with cuts from that Imagine cartridge and also lots of Stickles. The "ribbon" actually isn't ribbon at all. It is rayon seam binding that I colored using alcohol inks, then scrunched and dried with my heat gun. This project was simple and will serve as a tool caddy since I have filled up every available container with scrapping tools!! haha
I love comments, so let me know what ya think!
Blessings and hugs!
Linda


 I photographed this project before all the glue was completely dry which is why the edges appear to be sticking up. As the glue dried, they are now flush with the paper, but I just couldn't wait to share the pictures!! haha
This is my project for the January challenge at Sugar Sweet Paper Treats. The challenge was to alter something. This is a simple coffee can. I covered it with paper, then fussy cut the border and added that to the can, then used TONS of Stickles to make the flowers all shimmery! I even used my Imagine. I discovered that the color pallete of Lori's Garden matched my papers perfectly, so the back is decorated with cuts from that Imagine cartridge and also lots of Stickles. The "ribbon" actually isn't ribbon at all. It is rayon seam binding that I colored using alcohol inks, then scrunched and dried with my heat gun. This project was simple and will serve as a tool caddy since I have filled up every available container with scrapping tools!! haha
I love comments, so let me know what ya think!
Blessings and hugs!
Linda

Here's a close up of the front showing more of the shimmer

Here's the back:

Saturday, January 1, 2011
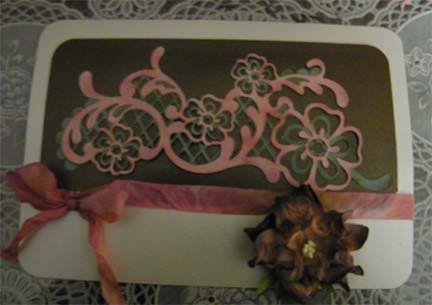
My Pink Stamper Design Team Challenge Project
Ok, let me just say right off that I by no means feel qualified by any stretch of the imagination to be chosen for Robyn's awesome design team, but it was a rainy day here in California and I was bored, so this card was born! My focal image was cut at 2 3/4" from the Elegant Cake cartridge. It is called Accent 8 and is on page 37 of the handbook. I first cut the base in a soft sage green, then cut the layer in a pale pink. I then inked the green layer with Forest Moss Distress Ink and inked the pink layer with Victorian Velvet Distress Ink. I was really happy with the result, although it is difficult to photograph. Then I cut the brown layer from Chocolate Stardream cardstock. I LOVE this cardstock! It is so shimmery and beautiful and is awesome to work with. The brown layer is 7" X 3 1/2 ". The card base is also Stardream cardstock in Opal, which is a beautiful shimmery off-white. The card base is large-- 12" X 8 1/2", folded in half, making the card front 6" X 8 1/2". The brown mulberry flower is from iamroses.com. I love their flowers. This one is the 2" gardenia in brown. Now for the ribbon. It actually isn't ribbon at all. It is rayon seam binding that was white. I put it in a zip bag and added alcohol ink in Mountain Rose and Hazelnut, dried it with my heat gun as I scrumched it so it would look wrinkly, then misted it with Dazzling Diamonds Glimmer Mist and tied it on my card! So, that's it. Hope you like it!
Hugs!

Hugs!
Happy New Year!!!!
Happy New Year, bloggers!!! My prayer for you all is that 2011 is your happiest and healthiest ever!!!
Hugs!
Hugs!
Subscribe to:
Posts (Atom)


